Install Datastax OpsCenter to monitor Cassandra claster
There is a copy from the official site but with my own edits.
Installing OpsCenter on Debian or Ubuntu
Install the DataStax OpsCenter using APT repositories on Debian or Ubuntu distributions.
For a complete list of supported platforms, see DataStax OpsCenter – Supported Platforms.
Prerequisites
Note: Use the exact version listed in Prerequisites. For example, the default OpenSSL on Ubuntu. If running openssl version shows that 1.0.0 is installed, you must install OpenSSL 0.9.8:
- APT Package Manager is installed.
- OpsCenter hardware requirements: computer with 2 cores and 2 GB RAM.
- Your Cassandra or DataStax Enterprise cluster is properly configured and running.
- IP address or hostname of the machine where you are installing OpsCenter.
- IP address or hostnames of two or three of your nodes.
- Port number used by JMX (default is 7199).
- The latest version of Oracle Java SE Runtime Environment (JRE) 6 or 7.
- OpenSSH (sshd)
- Python 2.6+
- OpenSSL: 0.9.8. (SSL is enabled by default.)
Note: If OpenSSL is version 1.0.0, you must install OpenSSL 0.9.8:
$ sudo apt-get install libssl0.9.8
After installing OpenSSL 0.9.8, Ubuntu 11.10 will still show 1.0.0.
To check for the software versions:
$ java -version
$ python -V
$ openssl version
Note: There are different package repositories for the Community and Enterprise versions of OpsCenter.
The OpsCenter Debian and Ubuntu packaged releases runs as a service from root. The service initialization script is located in /etc/init.d. If the machine reboots, OpsCenter restarts automatically.
Procedure
- Ensure that a DSE or Cassandra cluster is installed, configured, and running. You can determine this by using the nodetool status command.
- Open the aptitude repository source list file (/etc/apt/sources.list) for editing. For example:
# sudo vi/etc/apt/sources.list
- In this file, add the repository for the edition you want to install. OpsCenter Enterprise Edition installations require the DataStax <username> and <password> you received in your registration confirmation email.
- OpsCenter Community (free) Edition:
deb http://debian.datastax.com/community stable main
- OpsCenter Enterprise (paid) Edition:
deb http://<username>:<password>@debian.datastax.com/enterprise stable main
- Add the DataStax repository key to your aptitude trusted keys:
# sudo curl -L http://debian.datastax.com/debian/repo_key | sudo apt-key add –
- Install the OpsCenter package using the APT Package Manager:
- OpsCenter Community (free) Edition:
# sudo apt-get update
# sudo apt-get install opscenter-free
- OpsCenter Enterprise (paid) Edition:
# apt-get update # apt-get install opscenter
- Set the [webserver] interface to the hostname or IP address of the OpsCenter machine in the /etc/opscenter/opscenterd.conf file. For example:
7. [webserver ] port = 8888
interface = 10.183.170.161
uncomment these lines if you want to use SSL:
ssl_keyfile = /var/lib/opscenter/ssl/opscenter.key
ssl_certfile = /var/lib/opscenter/ssl/opscenter.pem
ssl_port = 8443
Use the /usr/share/opscenter/bin/set_passwd.py tool (included with OpsCenter) to set passwords.
- Start OpsCenter:
sudo service opscenterd start
- Connect to OpsCenter
Installing OpsCenter on RHEL, CentOS, or Oracle Linux
Install the DataStax OpsCenter using Yum repositories on RedHat Enterprise Linux (RHEL), CentOS, and Oracle Linux (OL) distributions.
For a complete list of supported platforms, see DataStax OpsCenter – Supported Platforms.
Prerequisites
- Yum package management utility.
- OpsCenter hardware requirements: computer with 2 cores and 2 GB RAM.
- Your Cassandra or DataStax Enterprise cluster is properly configured and running.
- IP address or hostname of the machine where you are installing OpsCenter.
- IP address or hostnames of two or three of your nodes.
- Port number used by JMX (default is 7199).
- The latest version of Oracle Java SE Runtime Environment (JRE) 6 or 7.
- OpenSSH (sshd)
- Python 2.6+
Note: If OpenSSL is version 1.0.0 is installed on RHEL 5.x, CentOS 5.x, OEL 5.5, Debian , or Ubuntu systems, you must install OpenSSL 0.9.8. See Error exceptions.ImportError:libssl.so.0.9.8.
After installing OpenSSL 0.9.8, Ubuntu 11.10 will still show 1.0.0.
To check for the software versions:
$ java -version
$ python -V
$ openssl version
Note: There are different package repositories for the Community and Enterprise versions of OpsCenter.
The CentOS, RHEL, and OL OpsCenter packaged releases create an opscenter user. OpsCenter runs as a service and runs as this user. The service initialization script is located in /etc/init.d. If the OpsCenter machine reboots, OpsCenter restarts automatically.
Procedure
- Ensure that a DSE or Cassandra cluster is installed, configured, and running. You can determine this by using the nodetool status command.
- (CentOS 5.x/RHEL 5.x only) On the OpsCenter machine, make sure you have EPEL (Extra Packages for Enterprise Linux) installed. EPEL contains dependent packages, such as Python 2.6+. To install for both 32- and 64-bit systems:
# rpm -Uvh http://dl.fedoraproject.org/pub/epel/5/i386/epel-release-5-4.noarch.rpm
You do not have to install EPEL other machines.
- Open the Yum repository specification /etc/yum.repos.d for editing. For example:
# vi /etc/yum.repos.d/datastax.repo
- In this file, add the repository for the edition you are installing. OpsCenter Enterprise Edition installations require the DataStax <username> and <password> you received in your registration confirmation email.
- OpsCenter Community (free) Edition:
o [opscenter ] name = DataStax Repository
o baseurl =http://rpm.datastax.com/community
o enabled =1
gpgcheck =0
- OpsCenter Enterprise (paid) Edition:
o [opscenter ] name = DataStax Repository
o baseurl =http://<username>:<password>@rpm.datastax.com/enterprise
o enabled =1
gpgcheck =0
- Install the OpsCenter package:
- OpsCenter Community (free) Edition:
# yum install opscenter-free
- OpsCenter Enterprise (paid) Edition:
# yum install opscenter
- Install the OpsCenter package:
- OpsCenter Community (free) Edition:
sudo yum install opscenter-free
- OpsCenter Enterprise (paid) Edition:
sudo yum install opscenter
- Set the [webserver] interface to the hostname or IP address of the OpsCenter machine in the /etc/opscenter/opscenterd.conf file. For example:
[webserver]
port = 8888
interface = 10.183.170.161
uncomment these lines if you want to use SSL:
ssl_keyfile = /var/lib/opscenter/ssl/opscenter.key
ssl_certfile = /var/lib/opscenter/ssl/opscenter.pem
ssl_port = 8443
Use the /usr/share/opscenter/bin/set_passwd.py tool (included with OpsCenter) to set passwords.
- Start the OpsCenter:
sudo service opscenterd start
- Connect to OpsCenter
Connecting to OpsCenter and initializing
- Open a browser window and go to the OpsCenter URL at http://<opscenter_host>:8888 where <opscenter_host> is the IP or hostname of the OpsCenter machine. For example:
- http://111.123.4.5:8888
- http://ec2-21-22-14-46.compute-1.amazonaws.com:8888
or
- http://111.123.4.5:8443
- http://ec2-21-22-14-46.compute-1.amazonaws.com:8443
- In Add Cluster, enter the Hostnames or IP addresses of two or three nodes in the cluster and set the JMX set JMX and Thrift ports credentials, and then click Save Cluster.

Automatically deploying agents – Packaged installations
Quick and easy installation when you have installed OpsCenter from a package, or for installing the agent on the OpsCenter machine from a binary tarball.
This method uses the OpsCenter Dashboard to install agents. It provides an SSH connection between the agent and OpsCenter and requires login credentials.
Prerequisites
- Root or sudo access to the machines where the agents will be installed.
- Your Cassandra or DataStax Enterprise cluster is up and running.
- OpsCenter is installed and configured.
- JMX connectivity is enabled on each node in the cluster.
- You either configured the SSH port or you will accept the default SSH port (22) for node-agent communications.
Procedure
- Open a browser window and go to the OpsCenter URL at http://<opscenter_host>:8888 where <opscenter_host> is the IP or hostname of the OpsCenter machine. For example:
- http://110.123.4.5:8888
- http://ec2-22-22-14-46.compute-1.amazonaws.com:8888
- In Add Cluster, enter the Hostnames or IP addresses of two or three nodes in the cluster and set the JMX set JMX and Thrift ports credentials, and then click Save Cluster.
After OpsCenter connects to the cluster, a Fix link appears near the top of the Dashboard.
- Start installing the agents by clicking the Fix.

- In Install Node Agents, click Enter Credentials.

- In Node SSH Credentials, enter a username that has root privileges or sudo access to all of the nodes in your cluster, plus any other required credentials, and then click Done.
- In the Install Nodes Agent dialog, click Install on all nodes.
- If prompted, click Accept Fingerprint to add a node to the known hosts for OpsCenter.
Results
It takes a few minutes for OpsCenter to complete the agent installations. After all agents are installed, a success message is displayed.
Manually deploying agents – Tarball installations
Install agents on nodes running tarball installations of Cassandra or DataStax Enterprise clusters.
The agent where OpsCenter is installed is automatically installed; it is not installed on the other nodes in the cluster. Only after starting OpsCenter, is the agent.tar.gz file installed in the OpsCenter installation folder. Use this file to manually deploy the agents to other nodes in a cluster.
- Your Cassandra or DataStax Enterprise cluster is up and running.
- OpsCenter is installed and configured.
- JMX connectivity is enabled on each node in the cluster.
- SYSSTAT Utilities (needed for the collection of I/O metrics).
Procedure
- Copy the agent tar file from your existing OpsCenter installation directory to your cluster node. For example, to copy to the install location:
2. $ cd <install_location> usually /usr/share/opscenter
$ scp agent.tar.gz <user>@<node_IP>:/<install_location>
Or copy it via windows machine with WinSCP http://winscp.net/download/winscp517.zip (You will need in your ssh-key)
Note: The agent.tar.gz file is not created until you run OpsCenter for the first time.
- Log in to the node, copy the agent.tar.gz file to the desired location, and unpack it. For example:
$ ssh user@<node_IP>
$ cd <install_location> usually /usr/share/opscenter/agent
$ tar -xzf agent.tar.gz
The binary package creates and agent directory containing the installation files.
- Configure and start the agent:
- If needed, get the IP address of the OpsCenter host. On the node containing the OpsCenter:
b. $ hostname -i
- On the node where you are installing the agent:
d. $ cd agent
$ bin/setup <opscenter_host>
Note: Generally the agent can detect the listener IP address for the node, which is the IP address displayed for node by running nodetool ring -h localhost. If needed, add <node_listen_address> to the above command.
- Start the OpsCenter agent:
$ <install_location> bin/opscenter-agent (Use -f to start in the foreground.)
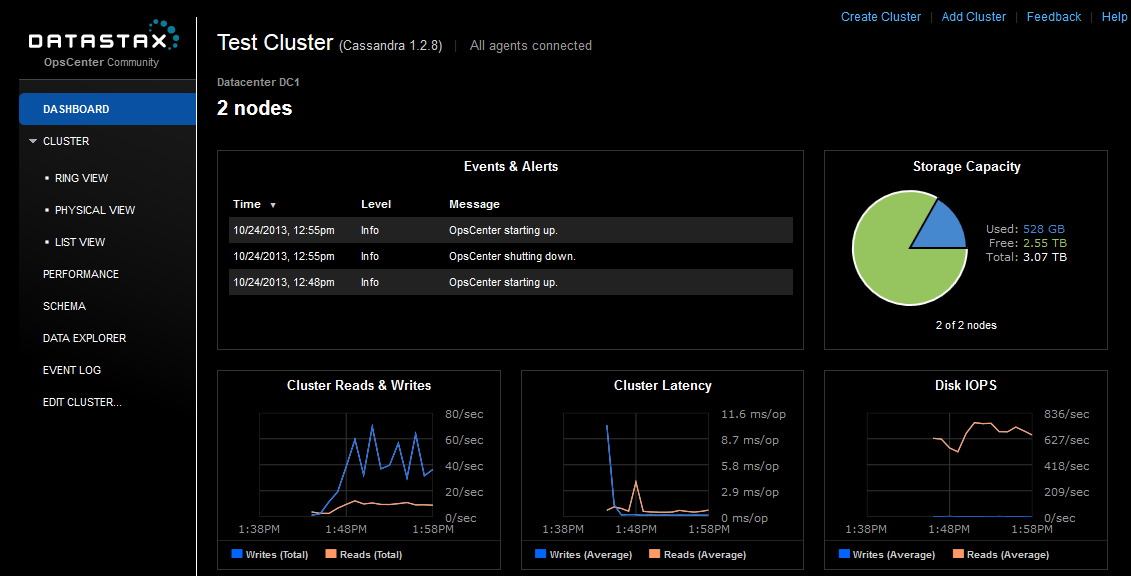
Checking
You have to watch something like this screenshot in your browser – e.g. 2 nodes connected.
If you don’t have connected nodes you will see the message on the top: “0 from 2 nodes connected Fix”.
Rollback actions
To deinstall:
On monitoring host:
1. sudo service opscenterd stop
2. sudo apt-get --purge autoremove opscenter-free
On client (Cassanra hosts):
1. ps ax | grep opscenter-agent
2. kill <process’ pid from the previous command>
3. sudo rm <install-location> (e.g. sudo rm /usr/share/opscenter)
Exchange 2010 + move e-mails to another transport server Windows 2008 R2 NPS + Ubiquiti AP Pro + Radius = issues